Nikon D5100 Portrait Tips, Tricks & Lenses

Feel free to read through all the helpful tips by scrolling down the page, OR you can jump to a section that sounds interesting to you by using the handy dandy drop down menu below.
Jump to a section below…
- 1. Lenses & Gear
- 2. Scene Modes
- 3. Secret Settings & Modes
- 4. Cool Tricks
- 5. Manual Portrait Settings
Lenses & Gear
Portrait Lenses
If you want to capture portraits, where the subject is sharp and the background is out of focus, it’s best to use a “bright” lens with a maximum aperture between f/1.2 and f/2.8. Lower f-numbers reduce the area in focus, giving you a shorter area in focus.
Each lens has a maximum aperture. This is the lowest aperture you can use with that particular lens. In order to obtain apertures between f/1.2 and f/2.8, you’ll need a lens that is capable of getting that low.
For example, the D5100 kit lens can only go down to f/3.5 when shooting towards the wide end (18mm) and f/5.6 when shooting towards the long end (55mm).
Here are some of my favorite (compatible) portrait lenses for the Nikon D5100 (ranked in order of price)…
- Nikon 35mm f/1.8G (See my visual guide & review) – Prime lens, good for small spaces.
- Nikon 50mm f/1.8G (See my visual guide & review) – Prime lens, good for creating space between you and your subject (makes your subject feel more comfortable).
- Nikon 50mm f/1.4G (See here: Amazon · B&H) – Prime lens, better low light ability and even shallower depth of field.
- Nikon 85mm f/1.8G (See here: Amazon · B&H) – Prime lens, perfect focal length for flattering portraits.
- Tamron 17-50mm f/2.8 (See here: Amazon · B&H) – Zoom lens, constant f/2.8 throughout the focal range. Gives you more freedom when composing images indoors.
- Sigma 17-50mm f/2.8 (See here: Amazon · B&H) – Zoom lens, constant f/2.8 throughout the focal range. Slightly better build than the Tamron.
- Nikon 17-55 f/2.8G (See here: Amazon · B&H) – Zoom lens, constant f/2.8 throughout the focal range. Produces sharper images when compared to the Tamron and Sigma versions.
- Nikon 85mm f/1.4G (See here: Amazon · B&H) – Prime lens, perfect focal length for flattering portraits. Better low light ability and even shallower depth of field when compared to the 85mm f/1.8G.
- Nikon 24-70mm f/2.8G (See here: Amazon · B&H) – Zoom lens, constant f/2.8 throughout the focal range. The zoom range is perfect for wedding photographers and capturing subjects in a wide range of venues.
External Speedlights
If the majority of your portraits will be indoors or in low light, it would be best to use an external speedlight in addition to one of the “bright” lenses mentioned above. An external speedlight will allow you to bounce light off a ceiling, rather than directly at your subject. This spreads the light evenly throughout the room, giving you more natural looking portraits indoors.
If you’re concerned about speedlights being too advance, don’t fret…they are easy as pie. Just attach it to your hot-shoe (metal bracket above the viewfinder) and power it up. In most situations, the speedlight will sync beautifully with the D5100 without having to do adjust any advanced settings.
Here are some of my favorite (compatible) portrait lenses for the Nikon D5100 (ranked in order of price)…
- Nikon SB-400 (See here: Amazon · B&H) – Basic, compact speedlight, with the ability to bounce light when shooting horizontally (landscape). Perfect for portraits around the house (with low ceilings).
- Nikon SB-700 (See here: Amazon · B&H) – More powerful speedlight, with the ability to pivot and swivel for bouncing light while shooting vertically or horizontally. It also comes equipped with wireless abilities.
- Nikon SB-910 (See here: Amazon · B&H) – Most powerful speedlight (great for groups) with the most advanced features for pro-level control.
Remotes
If you like to take self-portraits, a remote can be quite handy. Here are a couple compatible remotes for the D5100…
- Nikon MC-DC2 (See here: Amazon · B&H) – Wired remote that doesn’t require batteries, however, you’re limited to a 3 foot cord.
- Nikon ML-L3 (See here: Amazon · B&H) – A compact, wireless remote that requires batteries.
Scene Modes
If you’re in a pinch and don’t have time to adjust in-camera settings, you can use the Portrait and Night Portrait scene modes to quickly setup your D5100.
Portrait Mode
 Portrait mode will automatically adjust in-camera settings to capture soft, natural looking skin tones. With a proper lens, it will also blur the background to make the subject pop. See how to enable portrait mode or refer to page 30 of the manual.
Night Portrait Mode
 Night Portrait mode will lengthen out the shutter speed to capture more background light. Because of the slower shutter speeds, it’s best to use a tripod to prevent camera shake and to capture subjects that can remain very still throughout the shot. See how to enable night portrait mode or refer to page 32 of the manual.
Secret Settings and Modes
Accurate Skin Tones with White Balance
 In order to get spot on, accurate skin tones in a variety of lighting conditions, it’s a good idea to adjust the white balance. The D5100 comes with a couple preset modes, like incandescent, fluorescent, cloudy, etc… See how to select a preset white balance or refer to page 81 of the manual. In situations where you’re struggling to get accurate colors with the preset WB options, you can set a custom white balance. See how to set a custom white balance or refer to page 84 of the manual.
Properly Exposed Faces with Center-weighted Metering
 In situations with lots of contrast (example: subject backlit by a bright sun), it’s best to adjust your metering mode to Center-weighted. This will allow you to properly expose your subjects face, rather than ending up with a dark silhouette. See how to enable center-weighted metering or refer to page 68 of the manual.
Sharp Eyes with Single-servo AF and Single-point AF modes
 Rather than letting the D5100 choose the focus point and running the risk of an out-of-focus shot, you can get full control by enabling Single-servo AF and Single-point AF. Single-servo AF allows you to lock focus by half-pressing the shutter button. See how to set your focus mode to AF-S or refer to page 39 of the manual. Single-point AF allows you to control the exact location of the focus point. See how to set your AF-Area mode to Single-point or refer to page 42 of the manual.
Self Portraits with the Self-Timer
 If you’d like to capture some unique shots of yourself, you can use the self-timer which triggers the shutter after a few seconds…allowing to get yourself setup and ready for the shot. See how to enable the Self-Timer or refer to page 37 of the manual.
Red-eye Reduction and Correction
 To minimize the chance of red-eye using the built-in flash, the D5100 can fire a pre-flash which helps reduce (not eliminate) red-eye. See how to enable the Red-eye Reduction or refer to page 51 of the manual.
If you’re not a big fan of the pre-flash, you can try removing red-eye after the fact using the built-in correction feature which will attempt to detect and remove red-eye. See how to enable the Red-eye Correction or refer to page 178 of the manual.
Cool Tricks
Capture Bokeh (background blur) with your 18-55mm kit lens
The kit lens is designed to be a general outdoor shooter. If you want to capture portraits, where your subject is sharp and the background is out of focus, it’s best to use a lens with a maximum aperture between f/1.2 and f/2.8 (as mentioned above). The D5100 kit lens can only go down to f/3.5 when shooting towards the wide end (18mm) and f/5.6 when shooting towards the long end (55mm).
In order to get a nice bokeh effect, enable Portrait mode (or Aperture priority with the lowest f-number selected) and zoom between 50mm and 55mm. Then get as close as you can to your subject (filling the frame) while creating as much space as possible between your subject and the background.
Use Continuous shooting (burst) to Capture fantastic Candids
Some of the best portraits are those where the subject is unaware of shot being taken. You can capture some wonderful moments, just before and after your subject smiles by using Continuous shooting. Sometime referred to as ‘Burst’ mode, Continuous mode will give you the ability to rattle off a series of shots in quick succession by holding down the shutter button. See how to enable Continuous shooting (burst) mode or refer to page 35 of the manual.

Get natural, softer looking skin tones with Portrait Picture Control
 If you’re not one to post-process (edit) photos, then you can achieve softer skin tones and textures by using the Portrait picture control. This will tweak the in-camera processing, giving you more flattering portraits. If you shoot in RAW, you can further tweak the Picture Control settings after the fact using the included utility application bundled with the ViewNX 2 software. See how to enable the Portrait Picture Control or refer to page 91 of the manual.
Intentional sun flare with Spot Metering
 If you like the effect of capture sun rays along with your portraits, you can use Spot metering to ensure your subject is properly exposed rather than a dark silhouette. When coupled with Single-point AF, the D5100 will meter the chosen autofocus point rather then entire image. See how to enable Spot Metering or refer to page 68 of the manual.
B&W Portraits with Colorful Eyes
 You can use the Selective Color feature to make eyes pop against a black and white portrait. This is done after the fact inside the Retouch Menu. See how to use the Selective Color tool or refer to page 189 of the manual.
B&W, Sepia and Tinted Portraits
 For added effect, you can use Monochrome mode to capture black and white, cyanotype (blue and white), sepia or tinted portraits. See how to enable Monochrome or refer to page 91 of the manual. You can also capture a full color photo and then edit a copy using the Monochrome feature inside the Retouch Menu.
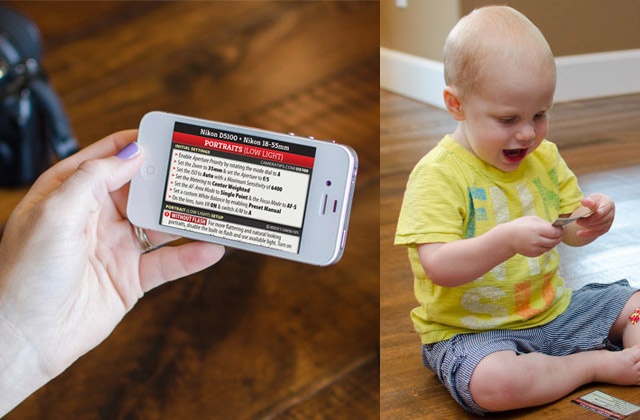
Manual Portrait Settings
If you’re looking to get out of Auto and experiment with Aperture, Shutter Speed and ISO while taking portraits, then I encourage you to check out my Cheat Cards for the Nikon D5100 which tell you exactly which settings and modes to use for taking portraits in both bright outdoor light and low light situations.