Low Light Portrait Tips for the Nikon D3200
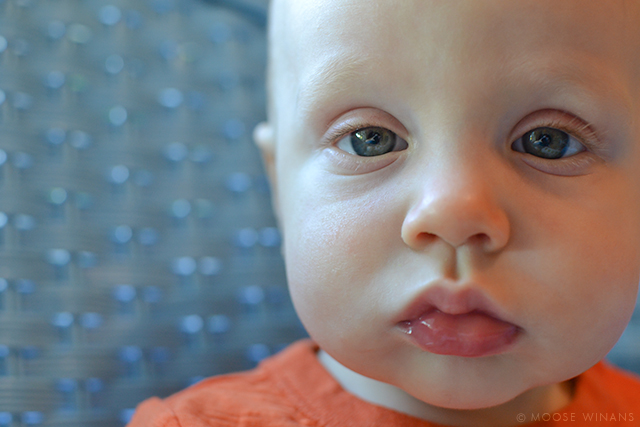
As a parent, there’s nothing greater than capturing priceless moments. On this particular day, my son decided to have a little food fight with a neighboring wall. He was victorious. The wall never threw any food back.
Much like a champions parade, he was carried to the “time out chair” to spend a few minutes reveling in his glorious win…or at least, that’s what he thought was happening.
Once he realized he was on time out, the puppy dog eyes and pouty lips where engaged. I swear this look gets me every time. To save face, I bit my lip trying not to smile.
While he sat in the chair, I realized this would be a perfect opportunity to grab a portrait. Kids never, ever, stay still. If you’re a Mom or Dad, you know what I’m talking about.
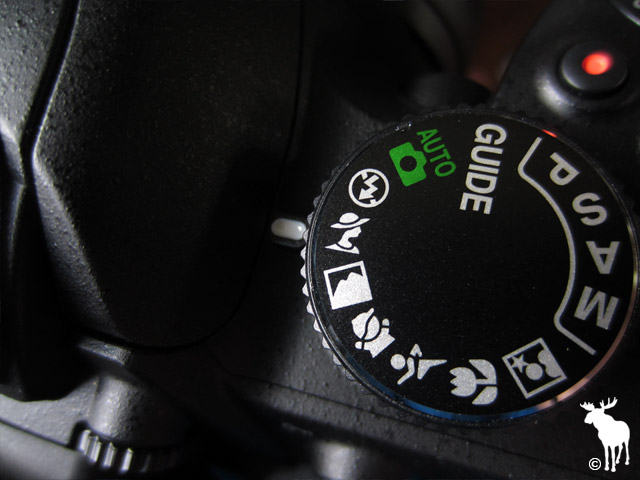
Much like I always do, I make sure and grab the shot first because you never know how long that moment will last. So I threw on my Nikon 35mm f/1.8G lens, quickly rotated the mode dial over to the Portrait Scene Mode and snapped a photo.
Remember, it’s always better to get the shot rather than to miss the shot completely.
Knowing that I had a few more seconds, I decided to set everything up manually so I could get the results I was after. So I started off by switching the Shooting Mode to Aperture Priority (A on the mode dial) and set the Aperture f-number to f/2.8. Watch the video below to learn how to enable Aperture priority and change the f-number on the Nikon D3200.
When shooting in low light, it’s best to use a lens with a low aperture f-number. This will produce smoother backgrounds and foregrounds, making your subject pop off the image. In addition, it will help keep noise levels down while also increasing the shutter speed, ensuring you end up with a sharper image.
Had I been using the 18-55mm f/3.5-5.6 kit lens, I would’ve zoomed to 35mm and set the Aperture to f/5 which is the lowest available f-number at that particular focal length.
TIP: I don’t recommend shooting portraits between 18-24mm on your kit lens. If you do, you’ll end up with distorted facial features and a larger depth of field (less chance of blurring the background behind your subject). Adjust your lens between 35mm-55mm and get as close as you can to the person you’re photographing. If you can, try to position the subject so that the background isn’t directly behind them.
In case you’re wondering, the reason I set the aperture to f/2.8 instead of f/1.8 is because I wanted to make sure I got his entire face (eyes, nose, lips) in focus. With it set to f/1.8, its possible his nose and lips would’ve been outside the area in focus. By raising the aperture a bit, you’re effectively lengthening the area in focus. Had I raised it to say f/5.6, the chair behind him would’ve probably been in focus.
Next, I set the ISO to Auto, the Maximum Sensitivity to 3200 and the Minimum Shutter Speed to 1/125.
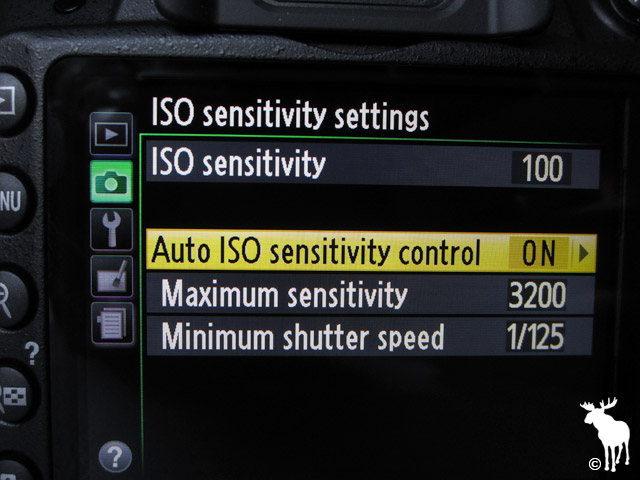
This tells the D3200 to automatically choose the ISO based on the lighting, but restricts it from choosing an ISO above 100 and a shutter speed below 1/125.
By setting the maximum sensitivity to 3200, I’m ensuring I don’t end up with excessive noise. ISO 6400 and above is down right grainy and muddy.
By setting my minimum shutter speed to 1/125, I’m ensuring the shutter speed is fast enough to freeze the movements of my son while also minimizing the effects of camera shake. Had I been photographing an adult, I could have got away with setting it to 1/60.
Next, I set the Metering to Center-weighted.
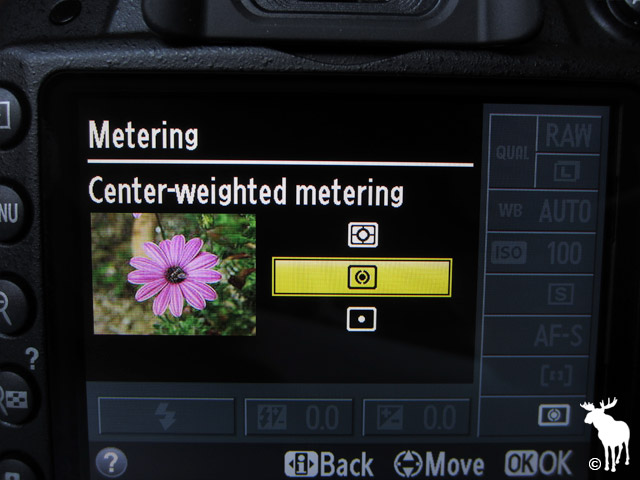
This ensures the exposure is being evaluated on my son’s face rather than evaluating the entire room. I don’t care if the chair behind my son is overexposed (bright) or underexposed (dark).
Now I realize in this shot, my son’s face is positioned towards the right hand side of the frame. In order to lock the exposure on his face, I had to first center him in the middle of the frame and press the AE-L/AF-L button.
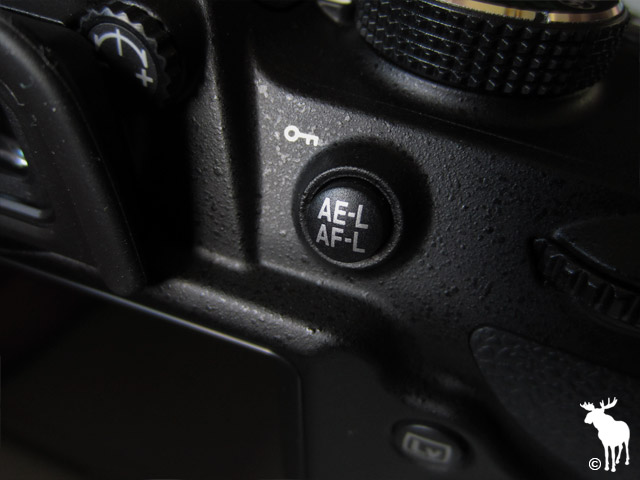
As long as you have this button pressed, it will lock the exposure so you can recompose the shot and still ensure your subjects face is properly metered.
With all of my exposure adjustments in place, it was time to turn my focus to autofocus…pun intended. :)
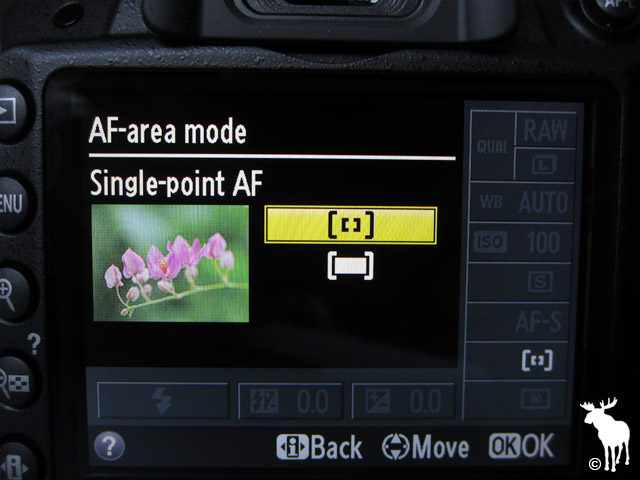
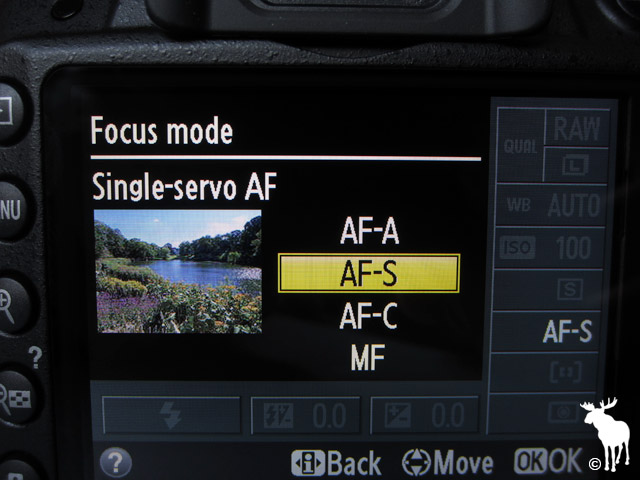
I set the AF-Area Mode to Single-Point AF and the Focus Mode to AF-S. This combination allowed me to select a focus point in the viewfinder (I chose the center point) and then with a half-press of the shutter button I was able to lock focus on my son’s eyes.
The AF-area mode let’s you choose which focus points are engaged. In this particular case, I wanted his eyes to be in sharp focus. So I went with the center focus point and pointed it directly at his eyes.
The focus mode determines whether focus is locked or if it continuously adjusts while the shutter button is half-pressed. Knowing that I wanted to position him off-center, I chose AF-S (Single-servo AF), which locked the focus and allowed me to recompose the shot.
Now you may remember that I previously mentioned using the AE-L/AF-L button to lock the exposure.
So how do you lock the focus and the exposure at the same time?
Just position your subject in the middle of the frame, half-press the shutter button to lock focus (continue to half-press), fully press the AE-L/AF-L button to lock the exposure (continue to press), reframe the shot for a better composition and then fully press the shutter button to take the photo. Once you do this combination a few times, it will feel like second nature to you.
So there you have it! My process for shooting low light portraits with the Nikon D3200.
Portrait Settings for the Nikon D3200
Here’s a recap of the settings I used…
- Aperture Priority mode (A on the mode dial)
- Aperture set to f/2.8
- ISO set to Auto with a Max Sensitivity of 3200 and a Min Shutter Speed of 1/125
- Focus Mode set to AF-S
- AF-Area mode set to Single-Point AF
- Metering set to Center-weighted
- Image Quality set to NEF (RAW)
- Focal Length fixed at 35mm
Portrait Photography Cheat Sheets for the Nikon D3200
 If you’re interested in portrait photography and looking to get out of Auto mode, I encourage you to check out my Cheat Cards for the Nikon D3200 which tell you exactly which settings I would use for taking portraits indoors and outdoors.
In addition to portrait settings, there are other cheat sheets for taking photos of small groups, couples, pets and more. These cards can be printed at home or viewed on an iPhone, Android, iPad, Kindle or computer.
Secret Settings & Modes For Shooting Portraits
Here are a few features and functions buried deep within the Nikon D3200 menu system that you may find helpful when photographing portraits.
Specialized Portrait Scene Modes
As I mentioned above, I initially used the Portrait Scene Mode to grab the shot. Had my son decided he wasn’t in the mood for a photo, I would’ve missed out on an opportunity to capture his expression. Don’t ever miss out on priceless moments like these. Always get the shot first and then if you have time, tweak the settings to your liking.
Thankfully, the Nikon D3200 comes with two portrait scene modes on the mode dial.
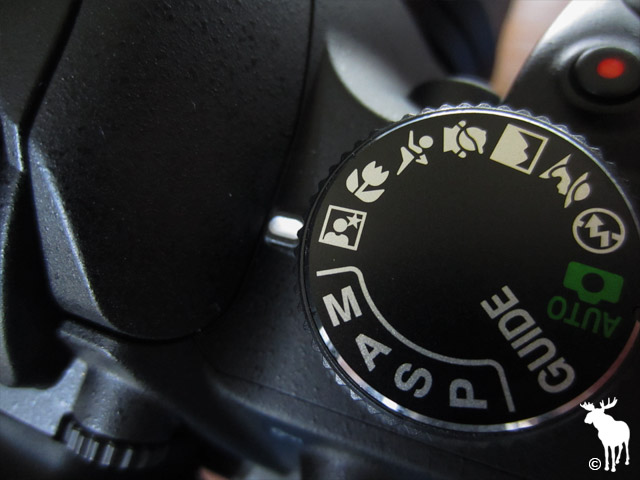
- Portrait – Uses a small aperture f-number to soften background details. Best used outdoors (daytime) or indoors with natural sunlight hitting your subjects face.
- Night Portrait – Uses a slower shutter speed to capture more background light, while also engaging the flash to illuminate your subject. Best used at night, outdoors or indoors. Be sure you and your subject remain very still during the exposure.
See page 25 in the manual for setup instructions.
Autoexposure Lock When Shutter Button is Pressed
As I mentioned previously, you can press the AE-L/AF-L button to lock the exposure. However, if pressing two buttons while recomposing the shot is too much of a challenge, you can enable the Shutter-release button AE-L feature.
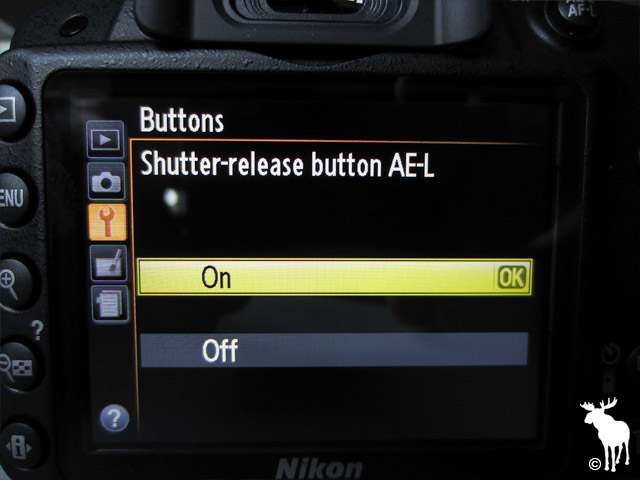
With this featured enabled, I would have positioned my son’s face in the center of the viewfinder, locked focus and exposure by half-pressing the shutter button and then recomposed the shot to frame him towards the right side of the photo. See page 144 in the manual for setup instructions.
Accurate Skin Tones with White Balance
Whenever possible, try to position your subject near a window with indirect sunlight. In this particular situation, the “time out chair” was right next to a northward facing window. The natural sunlight was able to illuminate the side of his face while also casting beautiful light throughout the room.
If no natural light is available and you’re getting some funky lookin’ skin tones, try setting your White Balance to Incandescent or Fluorescent.
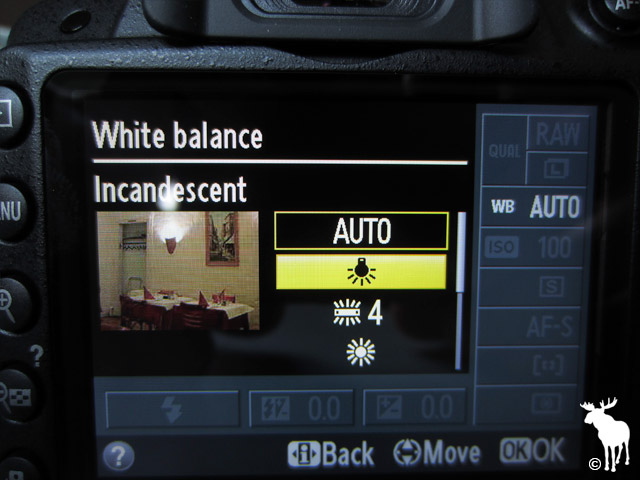
Most of the time, this will fix the color casts that occur when shooting indoors. If the color still doesn’t look right, you’ll need to set the White Balance to Preset Manual and do a custom white balance measurement using a white wall or piece of paper. See page 69 in the manual for setup instructions.
Continuous shooting (burst) to Capture Candids
Sometimes the best expressions are the moments before and after your subject smiles. By setting the Release Mode to Continuous, you can hold down the shutter button to fire off a burst of images in rapid succession.
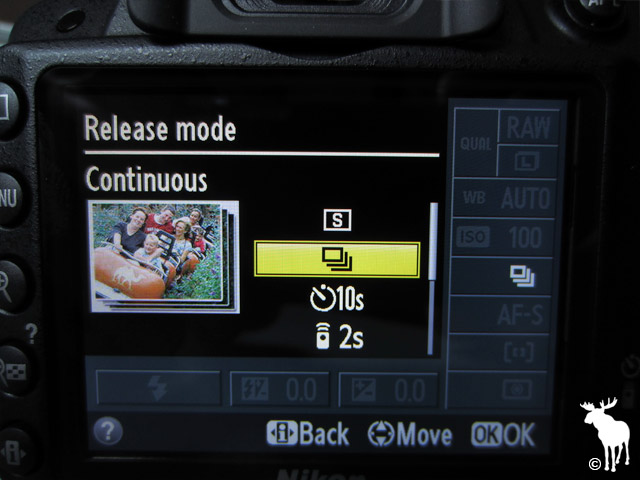
Since I was able to capture this priceless expression of my son I didn’t feel the need to do a continuous burst, but I have used this technique many times in the past. See page 31 in the manual for setup instructions.
For more tips and tricks, check out the forum or jump back to the Nikon D3200 homepage. Happy shooting!